How To Relay Emails with Zoho
By Lance Goens - 1/5/2020 12:58:00 PM
A Contact Us page for your website
So you have a website and you have a "Contact Us" page and you want to use said page on said website to allow users to send you emails - that is an extremely clever idea!
In my situation, I was dealing with the fallout of Godaddy opting to stop providing their free Workspace email with hosting accounts. For years I've used their relay service to allow my websites to send emails to me from customers wanting to contact me and other operational needs. So... since they pulled the plug, I've had to find a new solution. In about 15 minutes worth of Googling I found a few providers and opted to go with Zoho because... well... free :)
So I followed their instructions to repoint my DNS MX records to their servers and setup all the anti-spoof and DKIM stuff and ended up with a quite nice email application. Next step... can I relay emails from my contact pages across my various sites - Answer: YES!
The code that makes it all happen
To my surprise, Microsoft has obsolete-d System.Net.Mail's Smtp Client so more Googling lead me to MailKit - an open source library to send emails. It can be found in Nuget and installed with the following command (version 2.4.1 at the time of this writing):
Install-Package MailKit -Version 2.4.1
Now, once you have this installed in your project in Visual Studio, it's time to rewrite all of your code that actually sends the email. I'll pick up this process at the point in the code that you're ready to send the email and describe my woes along the way and how I overcame them.
First, I went in search of SMTP relay settings for Zoho. My searches landed me here:
https://www.zoho.com/mail/help/zoho-smtp.html
On that page, they describe SMTP Configurations. They provide an option for SSL and also TLS, which are not the same, and in my case, SSL was the way to go. From there, it states the following items are of importance for setup:
- Outgoing Server Name (SMTP relay server) : smtp.zoho.com
- Port: 465
- Security Type: SSL
- Requires Authentiaction: Yes
With this info in mind and on my clipboard, I headed back into Visual Studio with the task of rewritting my mailer code to utilize MailKit / MimeKit and to update the server and connection info to utilize Zoho's SMTP server. My SendMail method receives a concatenated First and Last name (sendersName) from my form as well as email address (customersEmailAddress), phone number (customersPhone), and some comments (customerComments) containing any questions or the reason they are contacting me. Below is what I ended up with (sensitive items replaced with angle brackets: <YOU SHOULD REPLACE THIS>):
 private void SendMail(string sendersName, string customersEmailAddress, string customersPhone, string customerComments)
    {
        // Wrap your email code in a try/catch block so you can get exception information if it fails!
        try
        {
            // Use full email address as username.
            MailboxAddress sendingAddress = new MailboxAddress("<DISPLAY NAME>", "<ZOHO EMAIL BOX>@<YOUR DOMAIN.COM>");

            /*
               fromAddress: is who the email is sent from, your zoho account.
               sendersName: is the value passed in and is the name the person entered in the contact form
            */
            MailboxAddress fromAddress = new MailboxAddress(sendersName, "<ZOHO EMAIL BOX>@<YOUR DOMAIN.COM>");

            /*
               customersAddress: is the email address of the person submitting the form.
               This is used as a reply-to below so you can just hit reply in your email application to respond to your customer.
            */
            MailboxAddress customersAddress = new MailboxAddress(sendersName, customersEmailAddress);

            // Now that the addresses are established, build and send the email.

            // Create a new message object.
            var message = new MimeMessage();

            // Where the message will be sent to.
            message.To.Add(sendingAddress);

            /*
               The email address is the same as the sendingAddress, but the display name is different.
               This allows your email client to show the name of your customer in the message preview.
            */
            message.From.Add(fromAddress);

            /*
               Reply to allows you to just hit reply on the received message and reply to your customer.
               Without this, the reply button would reply to the sendingAddress (which is you)
            */
            message.ReplyTo.Add(customersAddress);

            // Email Subject Line
            message.Subject = "Contact Request from: " + sendersName;

            /*
               Build a simple plain text email body.
               Here I'm including text values from controls in my contact form that were passed in to
               this function when the Submit button was clicked.
            */
            message.Body = new TextPart()
            {
                Text = "From: " + sendersName + Environment.NewLine +
                    "Phone: " + customersPhone + Environment.NewLine +
                    "Email: " + customersEmailAddress + Environment.NewLine +
                    "Comments: " + customerComments
            };

            // Send the email!
            using (var emailClient = new SmtpClient()) // Make sure your SmtpClient is from Mime/MailKit!
            {
                // The connection info for the zoho smtp server. Server Name, Port, Use SSL
                emailClient.Connect("smtp.zoho.com", 465, true);

                /*
                   I read that OAUTH should be removed as an authentication mechanism.
                   I have not tested with this line remove but it may work without it.
                */
                emailClient.AuthenticationMechanisms.Remove("XOAUTH2");

                /*
                   IMPORTANT! This part they don't spell out clearly. You must create an app password.
                   I'll describe this below
                */
                emailClient.Authenticate("<ZOHO EMAIL BOX>@<YOUR DOMAIN.COM>", "<APP PASSWORD>");

                // Send and disconnect - done!
                emailClient.Send(message);
                emailClient.Disconnect(true);
            }

            lblResult.Text = "Success! Your message was sent. You will now be redirected to the ";

        }

        // In my solution, I display failure messages to the user - this helped me troubleshoot when developing this.
        catch (Exception ex)
        {
            //If the message failed at some point, let the user know
            lblResult.Text = ex.Message + Environment.NewLine + "Your message failed to send. Please try again. You will be redirected to the ";
        }
    }
That's it... but the part that delayed me was the application password that Zoho expects. I didn't see this documented very well and ended up stumbling across it in my later troubleshooting at the link above. Essentially, if you supply your Zoho email address and the password for that email account, the message will fail to send / relay (even if your password is correct) and you'll get an authentication error message like the following:
535: Authentication Failed Your message failed to send.
"So how do I get an Application Password from Zoho?"
...you may be asking. It's pretty painless. Simply login to your Zoho administrator account at:
https://accounts.zoho.com
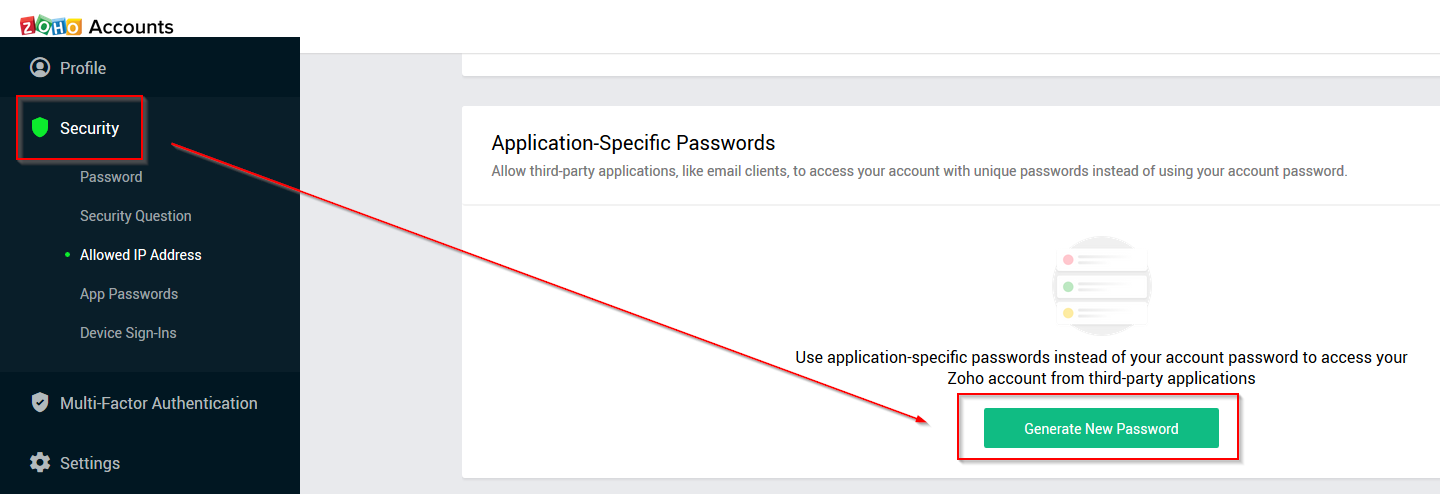
Once logged in, navigate to the Security page. On the security page, scroll down to the Application-Specific Passwords section. Click on the Generate New Password link / button.
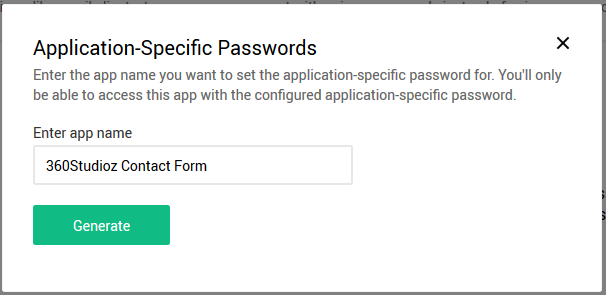
Enter a name for your application and click Generate.
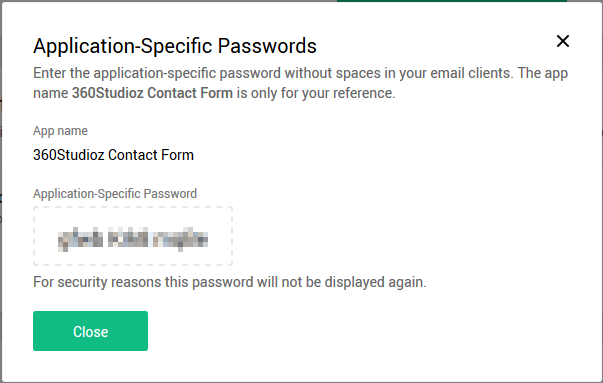
Once your application-specific password (blurred out below) has been generated, paste it into your code on the emailClient.Authenticate line in place of your actual password.
Deploy your code to your site and give it a test. With any luck you should have an email in your inbox!
If this article helped you use Zoho to send an email from your website or if you have feedback, leave me a comment below. Thanks for stopping by!